
Kintsugi leftovers??
3 hours ago
 This is made from our kraft boxes which come in packs of 4 for $5.95NZ. The bottom box has had panels of core'dinations cardstock which has been embossed with the woodgrain folder and sanded for texture. the top two are matted with candlelight christmas designer series paper. A window has been cut with the designer punch and a new flourish frame has been pressed in versamark and embossed in gold to take it from silver to gold to co-ordinate. The bird is made from the elegant bird die in champagne glimmer paper double layer for the wings to give them more body and the body of the bird has 2 layers of white cardstock inside the glimmer paper. The bird is nestled into some early espresso tulle. I think the rest is self explainatory.


 This was from a recent class . We brayered crumbcake over the vintage wallpaper folder prior to embossing, then sponged with baja breeze, old olive then early espresso. Then dried it off and dabbed versamark on it & gold embossed. The faux stitching went through both the whisper white & the mat to give deep textured faux stitching. A first attempt & it was fun. At each stage of the process from the brayered folder embossing look, to each of the sponged colours it looked as though it would make a great card.
  These super cute boxes are inspired by the lovely Rachael Knight who gave me a basket of 2 blue & 2 pink as a gift swap after convention. I just love them and we will be making them at our next class. The flower on the front two is the crysanthamum and the back pink one is the scallop flower. Ooh imagine them filled with chocolate.
  This card I demonstrated at our team training on saturday so it is a sneak preview to my next class of what we could be doing. The scoops are featuring shimmer paint, and the top one our gorgeous chocolate coloured glitter. The card colour is naturals ivory and on that pretty in pink and the designer series paper is the early espresso from the paper stack neutrals, a great pack such a good way to buy it and every so useful. Everything matches when you can get the card, designer series paper, ribbon, ink pads, marker pens, all in the same colours. Stampin' Up!Ⓡ has a huge range of co-ordinating products. If you would like to order some, please do not hesitate to email or phone me and I will organise it for you.
  This is my take on a WOW from convention in Canberra. I am teaching it at my next class. If you are keen to attend let me know. It will be July 15th or 20th. A nice easy to make treat holder this has a bag of Hersheys kisses in it, but it could be anything.
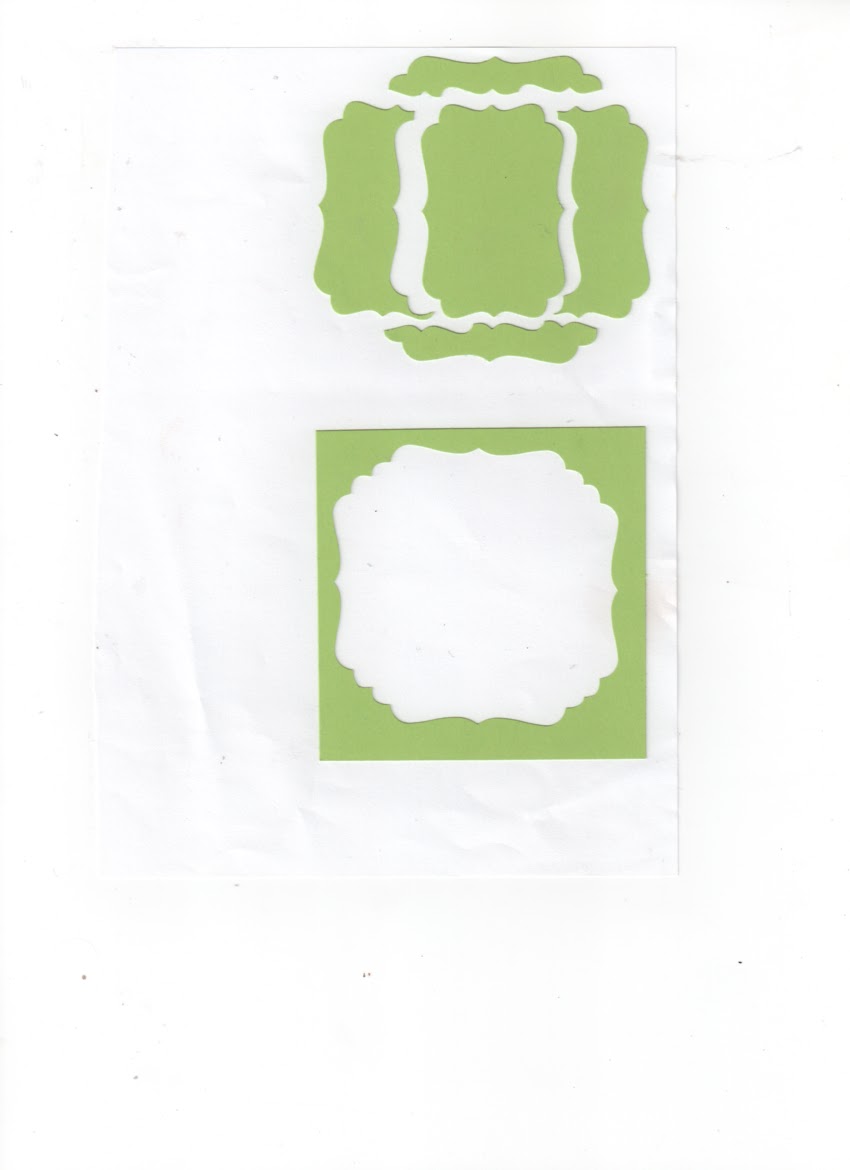 This is an easy way to make a lovely shaped window with the decorative label punch. See the plan Vertically the centre is the decorative label simple punch out, then either side of that a half a label is punched to widen it, and then turn the punch landscape and take a sligher off the top and bottom and there it is. We made a card today at class using this technique and the girls wanted the template. I got it off the net but honestly I cannot remember where, thanks to some clever lady I was able to share it.
 This was a challenge as my daughter in law is a fabulous card maker. Card base is Night of Navy. A white top note die cut is in the centre for writing on and I stamped Happy Birthday on it. The front top note is card covered with heavy tinfoil and die cut. I then rubbed it with a dauber and stazon black to give it a more metal look. The word happy is stamped with the Simple Alphabet die cut from the big shop I love these letters. I used the silver cardboard lid from a takeaway foil container. Silver brads and on the right to further hold the band of silver glimmer paper. Silver brads to stud the top note and I think it will fit the bill. My baby is now 39 OMG I feel old, and he has the gorgeous baby twins on my first scrapbook page below. I am so fortunate.
 |
| ZANE |
 |
| CADEN & CHELSEA |

 The box features the new framelets, and the butterfly die is cut out in velum and also designer paper to layer it. Hope you like it.


